Why This Air Fryer Blooming Onion Beats the Restaurant Version
If you have ever sat in a booth at a steakhouse staring at a golden blooming onion, you know the temptation is real. The deep fried version is crunchy, salty, and almost impossible to stop eating, but it also comes with a side of regret once you realize just how much oil it has soaked up. This air fryer version gives you all the satisfaction without leaving your kitchen smelling like a deep fryer.
Instead of dunking the onion in quarts of oil, the air fryer uses high heat and rapid air circulation to crisp every petal. The result is a blooming onion that is just as golden on the outside and tender on the inside, yet much lighter. It still has the savory spice blend and that satisfying pull-apart texture, but with far fewer calories and significantly less fat.
Table of Contents
Another win for the homemade version is the ability to choose your onion. Sweet varieties like Vidalia or Walla Walla mellow out beautifully when cooked, which means you get flavor without the overpowering bite of a raw yellow onion. You can also control the seasoning, adjust the heat level, and pick a dipping sauce that actually fits your taste rather than the one-size-fits-all restaurant sauce.
And perhaps the best part is that you can enjoy it fresh out of the air fryer while it is still at peak crispness. No waiting for a server, no soggy spots from sitting under a heat lamp, and no need to share unless you want to.
Ingredients You’ll Need
A great blooming onion starts with the right ingredients. Choosing each component with care makes a noticeable difference in both flavor and texture.
Primary Ingredient
The star of the show is one large sweet onion. Varieties such as Vidalia or Walla Walla have a naturally mild flavor that turns even sweeter when cooked. If you prefer a sharper onion profile, you can use a yellow onion, but keep in mind it will have a stronger taste.
Dry Mix
For the coating, you will need all purpose flour or a gluten free blend if you want an allergy friendly version. Add smoked paprika for depth, garlic powder for savory warmth, cayenne pepper for heat, dried thyme for an earthy note, and oregano for a hint of herbal freshness.
Wet Mix
Two large eggs whisked with milk form the second coating layer. Almond milk or oat milk works beautifully for a dairy free version. If you avoid eggs, a commercial egg replacer will still give you a crisp finish.
Optional Crunch Upgrade
A light layer of panko breadcrumbs can make the coating extra crunchy. You can also use seasoned breadcrumbs or even crushed cornflakes for a different texture.
Oil Spray
A high quality oil spray is essential for achieving a golden crust in the air fryer. Olive oil and avocado oil are both excellent choices. Avoid aerosol sprays with propellants, as they can damage the basket’s nonstick coating.
With these simple but intentional choices, you set yourself up for a blooming onion that rivals any restaurant version in both taste and texture.
How to Cut the Onion for a Perfect Bloom
The cut is what transforms an ordinary onion into a show stopping appetizer. It may look complex, but once you understand the method it becomes surprisingly simple.
Start by slicing off about half an inch from the top of the onion to create a flat surface. Peel away the papery outer skin and any tough first layer of flesh. Place the onion cut side down on a sturdy cutting board with the root facing upward.
Using a sharp knife, position the blade about half an inch away from the root and slice straight down until you reach the board. Rotate the onion a quarter turn and repeat until you have four evenly spaced cuts. Then make additional cuts between each section until you have sixteen equally sized petals.
Once the cuts are made, turn the onion over so the root is on the bottom. Gently separate the outer petals with your fingers. If you find the petals are too tight, letting the onion rest for a few minutes will help them relax and fan out naturally.
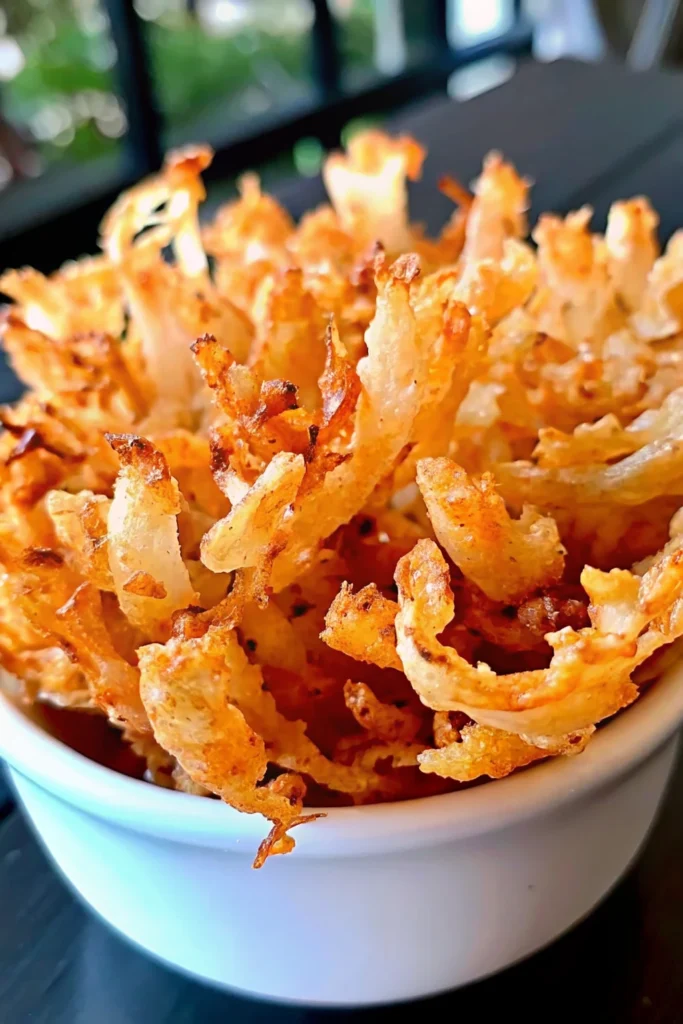
A well cut bloom is not just for presentation. Each petal that fans open allows the seasoning and coating to reach every surface, which creates that irresistible crunch in every bite.
Step-by-Step Air Fryer Blooming Onion Method
Making a blooming onion in the air fryer is all about preparation and layering flavors for maximum crunch. Follow these steps and you will have a golden, crispy appetizer ready to impress.
Step 1: Cut and Bloom the Onion
Prepare the onion as described earlier so the petals are evenly spaced and relaxed. This is the foundation for even cooking.
Step 2: First Flour Dredge
Place the onion cut side up in a large bowl. Sprinkle the seasoned flour mixture over the top, letting it fall between the petals. Use your fingers or a spoon to coat every visible surface. Turn the onion over to tap off any excess flour.
Step 3: Wet Coating
In another bowl, whisk the eggs with the milk until smooth. Dip the floured onion into the mixture, spooning it over the petals to ensure complete coverage. Let any extra liquid drip off.
Step 4: Second Coating
Return the onion to the seasoned flour or add panko for extra crunch. Coat it well, then place the onion on a plate and let it chill in the refrigerator for about ten minutes. This helps the coating stay in place during cooking.
Step 5: Prepare for Air Frying
Cut a piece of foil to fit in your air fryer basket. Place the onion on the foil, spray it generously with oil, and preheat the air fryer to the correct temperature.
Step 6: Air Frying
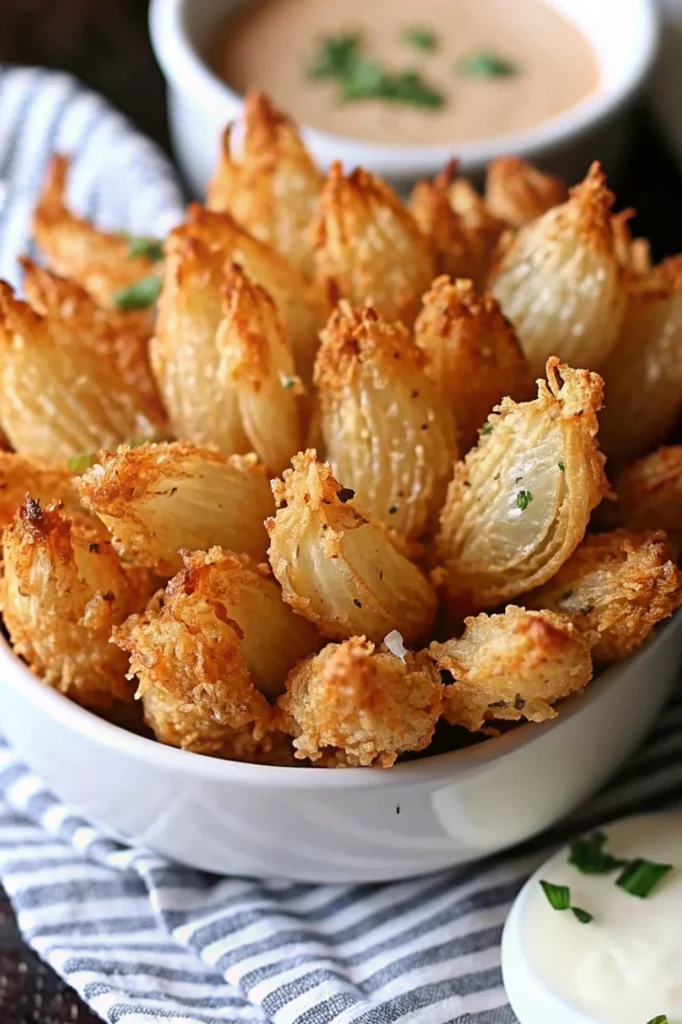
Cook the onion until the coating turns golden and crisp. Spray lightly with oil two or three times during cooking to keep the petals crunchy and prevent dry spots. When finished, use the foil to lift the onion out of the basket and serve immediately.
Following these steps ensures your blooming onion will have a crispy exterior and tender, flavorful layers inside.
The Secret to Extra Crispiness
A blooming onion is only as good as its crunch, and achieving that perfect bite comes down to a few simple but often overlooked details.
One of the most effective ways to boost crispiness is to use panko breadcrumbs in the final coating. Panko has a lighter, flakier texture than regular breadcrumbs, which allows more air to circulate around the petals while cooking. This creates a coating that is crisp without feeling heavy.
Double dredging also plays a major role. By coating the onion in seasoned flour, then dipping it into the egg mixture, and finally returning it to either flour or panko, you create layers that lock in moisture while building a sturdy crust. This prevents the onion from becoming soggy during cooking.
Oil application is just as important. A generous and even spray ensures that the coating browns properly and turns crunchy all over. Spraying the onion more than once during cooking helps revive any spots that begin to dry out.
The final touch is to let the onion rest for a few minutes before serving. This short pause allows the steam to settle so the crust stays crisp when you pull the petals apart.
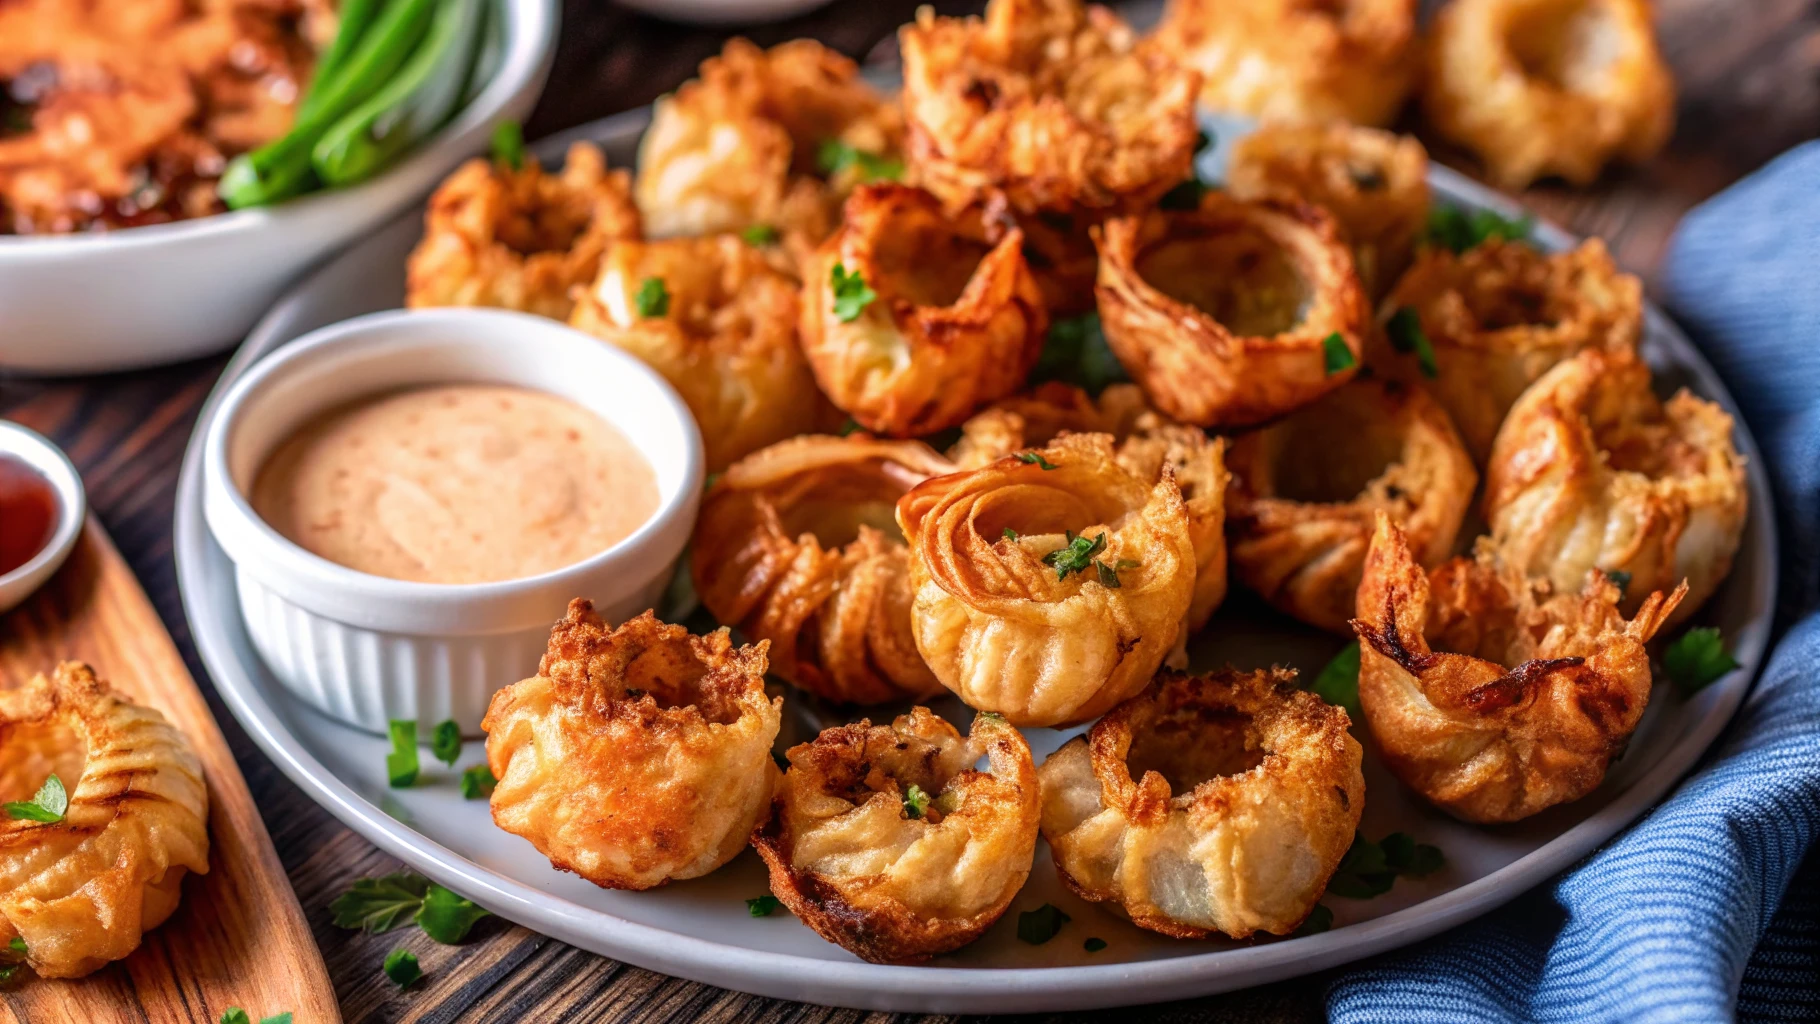
Serving and Dipping Sauce Ideas
A blooming onion is delicious on its own, but the right sauce can take it from good to unforgettable. Matching the seasoning of the onion with a flavorful dip creates a perfect balance of taste and texture.
One classic choice is a copycat version of the Outback blooming onion sauce. This combines mayonnaise, sour cream, ketchup, horseradish, paprika, and a hint of cayenne pepper. The result is creamy with a subtle kick that pairs beautifully with the crispy coating.
For those who like a little heat, a spicy Cajun mayo works wonders. Simply mix mayonnaise with Cajun seasoning, lemon juice, and a touch of hot sauce for a bold and zesty dip.
If you prefer something smoky, try a chipotle ranch made with ranch dressing, chipotle peppers in adobo sauce, and lime juice. The smokiness complements the paprika in the onion’s coating while the creamy texture cools down the spice.
Cheese lovers might enjoy a warm cheddar sauce served alongside the onion. The richness of melted cheese clings to each petal, making every bite extra indulgent.
When serving, place the dip in a small bowl in the center of the blooming onion for a striking presentation. This not only looks inviting but also makes it easy for guests to pull off petals and enjoy them immediately.
Variations to Try
One of the best things about making a blooming onion at home is the freedom to adapt it to your own tastes and dietary needs. Small changes in seasoning or ingredients can create an entirely different experience.
Gluten Free Blooming Onion
Swap the all purpose flour for a high quality gluten free flour blend. Add a tablespoon of cornstarch to the mix for extra crispness.
Vegan Blooming Onion
Replace the eggs with a commercial egg replacer or a mixture of plant based milk and cornstarch. Choose almond milk, oat milk, or soy milk for the wet mix and make sure the flour blend is vegan friendly.
Cajun Spiced Blooming Onion
Add Cajun seasoning to both the flour and the panko to create a bolder flavor profile. Serve it with a cooling ranch dip to balance the spice.
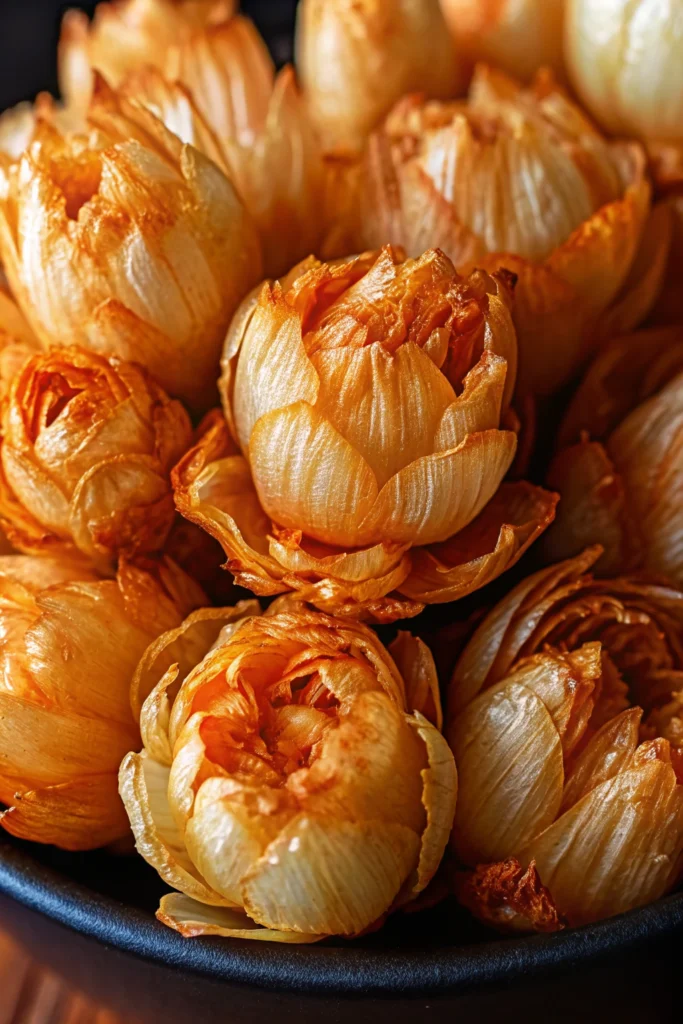
Mini Blooming Onions
Use smaller onions and prepare them the same way. These individual portions are perfect for parties and make it easier for guests to grab their own serving.
Experimenting with these variations can turn a single recipe into a collection of favorites that you can rotate throughout the year.
Troubleshooting and Pro Tips
Even a well tested recipe can sometimes run into small issues, especially the first time you try it. Knowing how to fix common problems will save your blooming onion and make the process much smoother.
Petals Sticking Together
If the petals do not open fully, let the onion rest longer after cutting. You can also soak it in cold water for ten minutes to help the layers separate naturally.
Flour Clumping
When flour clumps between petals, sift the dry mix before coating. Gently shake off any excess flour after the first dredge to avoid heavy spots.
Uneven Cooking
If some petals are darker than others, rotate the onion halfway through cooking. This ensures that all sides receive even heat from the air fryer.
Burnt Tips
Cover the top of the onion with a loose piece of foil during the first half of cooking. Remove it in the final minutes to allow the petals to crisp without burning.
Dry or Pale Coating
If the coating looks pale or dry halfway through, spray it with more oil. A light mist is often all it takes to bring back a golden finish.
Mastering these small adjustments will help you get consistent, beautiful results every time you make this appetizer.
Storage and Reheating
A blooming onion tastes best when eaten fresh, but if you have leftovers there are ways to keep them enjoyable. The key is to preserve as much crispness as possible while avoiding a soggy texture.
Short Term Storage
Place the cooled onion in an airtight container and store it in the refrigerator for up to two days. Make sure the container is large enough so the petals are not pressed together, as this can cause the coating to soften.
Reheating in the Air Fryer
Set the air fryer to 350 degrees Fahrenheit and warm the onion for three to five minutes. This method revives the crisp coating without overcooking the inside. Avoid using a microwave since it will make the petals limp.
Reheating in the Oven
If you do not want to use the air fryer again, place the onion on a baking sheet and heat it in a preheated oven at 350 degrees Fahrenheit for about ten minutes. Keep an eye on it so the tips do not burn.
While these methods help, the texture will never be quite the same as when it is freshly made. For the best experience, enjoy your blooming onion right after cooking.
FAQ
Can I make this ahead of time?
You can prepare the onion and coat it in advance, then store it in the refrigerator for up to four hours before cooking. This helps the coating set, which can improve crispiness. Wait to spray with oil until just before air frying.
Which onion is best for a blooming onion?
Sweet onions such as Vidalia or Walla Walla are ideal because their mild flavor becomes even sweeter when cooked. Yellow onions work as well but have a stronger taste.
Can I skip the panko?
Yes, you can leave it out and still get a crunchy texture from the flour coating. However, panko adds an extra layer of light crispness that many people enjoy.
Can I freeze a blooming onion?
It is not recommended. Freezing changes the texture of the coating and the onion itself, often resulting in a soggy and uneven reheated appetizer.
How spicy is this recipe?
The spice level depends on how much cayenne pepper or other hot seasonings you use. For a mild version, reduce or omit the cayenne. For a bolder flavor, add extra cayenne or a pinch of chili powder.
Air Fryer Blooming Onion
Ingredients
Method
- Slice off about 1/2 inch from the top of the onion, peel the skin, and make evenly spaced cuts to create 16 petals. Gently separate the petals.
- Mix flour, smoked paprika, garlic powder, cayenne, thyme, and oregano in a large bowl.
- Place onion cut side up in the bowl and sprinkle the seasoned flour over it, letting it fall between petals. Shake off excess flour.
- Whisk eggs and milk in another bowl. Dip the floured onion into the wet mixture, spooning it over to fully coat. Let excess drip off.
- Return onion to seasoned flour or coat with panko for extra crunch. Chill in refrigerator for 10 minutes.
- Place onion on foil in the air fryer basket, spray generously with oil, and preheat the air fryer.
- Air fry until golden and crisp, spraying lightly with oil 2–3 times during cooking. Lift out with foil and serve immediately.
Notes
Nutrition Information
Serving: 1g | Calories: 278kcal | Carbohydrates: 47g | Protein: 10g | Fat: 6g | Saturated Fat: 1g | Polyunsaturated Fat: 4g | Cholesterol: 65mg | Sodium: 101mg | Fiber: 3g | Sugar: 3g Nutrition facts are estimates.Conclusion
Making a blooming onion in the air fryer is proof that you can enjoy a crowd pleasing appetizer without the heaviness of deep frying. With the right cut, a flavorful coating, and a few small tricks, you can create an onion that is golden, crunchy, and full of flavor from the very first petal to the last.
This version allows you to experiment with different seasonings, dipping sauces, and even dietary adaptations so it fits your preferences perfectly. It is a recipe that works just as well for a weekend snack as it does for a party centerpiece.
If you have never tried making one at home, now is the perfect time. Your air fryer is ready, the ingredients are simple, and the result is a dish that will have everyone reaching for seconds. Serve it fresh, share it with friends, and enjoy the satisfaction of creating something that rivals the best restaurant versions.
More Air Fryer Chicken Recipes You’ll Love
Disclaimer: The recipes and nutrition information on this blog are provided for general informational purposes only. They are not intended as medical advice or as a substitute for professional dietary guidance.
Always consult a qualified healthcare or nutrition professional before making significant changes to your diet, especially if you have specific health conditions or dietary needs.